Now a Days, LCD or Liquid Crystal Display are very common for Displaying Alphanumeric characters.The Working of 16 x 1 LCD is Little Bit Different then of LCD 16 x 2.
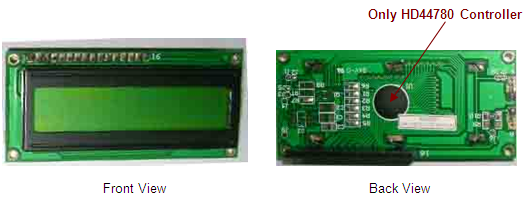
In Most of Cases 16 x 1 LCD is available without Auxiliary Controller. Means as you see only HD44780 Controller at Back Side. In this section we discuss LCD 16 x 1 with no Auxiliary Controller.
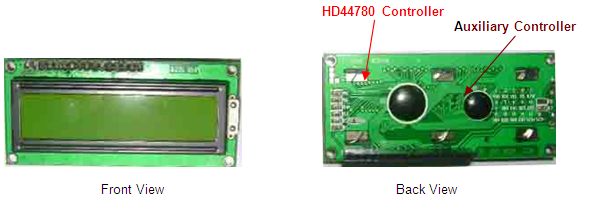
Figure 1: 16 x 2 LCD
Figure 2: 16 x 1 LCD
The above Images will clearly mention the difference between two. The 16 x 2 LCD having with Auxiliary Controller shows two epoxy blobs but the 16 x 1 LCD Shows only one epoxy blobs.Due to low cost Single Row LCD do not have Auxiliary Controller
LCD Addressing
Here is Addressing Scheme for 16 x 2 LCD.
Now Just Look at addressing scheme of LCD.
It is Interesting to know that LCD 16 x 1 is Technically LCD 8 x 2. But the Arrange or configuration will be different as below:
In Below program we have assumed following pin assignment with 8051 Microcontroller.
LCD DATA LINES = P2
LCD RW = Permanently Ground
LCD RS = P0.4
LCDEN = P0.3
Assembly Level Program
;SINGLE ROW LCD 16 x 1
; Technical LCD 16 x 1 = 2 x 8
; First 8 characters are at 00h - 07h and the others are at 40h - 47h. This must be initialized as a 2-line device.
; after writing first 8 characters, move your cursor to the location 40h (9th character) using this command: 0C0H
$mod51
rs equ p0.4 ; RS
en equ p0.3 ;EN
dat equ p2 ; DATA
org 0000h
mov a,#38h ; 16 x 1 LCD
acall command
mov a,#0fh ; Disply on,Cursor Blinking
acall command
mov a,#06h ; Increment Cursor
acall command
mov a,#01h ; Clear Disply
acall command
mov a,#80h ; Force Cursor to Begining of First Line
acall command
; Write first eight character
mov a,#'A' ; 1st Character
acall display
mov a,#'B' ; 2nd Character
acall display
mov a,#'C' ; 3rd Character
acall display
mov a,#'D' ; 4th Character
acall display
mov a,#'E' ; 5th Character
acall display
mov a,#'F' ; 6th Character
acall display
mov a,#'G' ; 7th Character
acall display
mov a,#'H' ; 8th Character
acall display
mov a,#0C0h ; Force Cursor to Begining of First Line
acall command
; Write first eight character
mov a,#'I' ; 1st Character
acall display
mov a,#'J' ; 2nd Character
acall display
mov a,#'K' ; 3rd Character
acall display
mov a,#'L' ; 4th Character
acall display
mov a,#'M' ; 5th Character
acall display
mov a,#'N' ; 6th Character
acall display
mov a,#'O' ; 7th Character
acall display
mov a,#'P' ; 8th Character
acall display
here: sjmp here
command:
mov dat,a
clr rs ;RS=0 For COMMAND REGISTER
setb en
clr en
acall ready
ret
; Approx. 20ms Delay
ready:
MOV TMOD,#01H
MOV TCON,#00H
MOV TL1,#0E0H
MOV TH0,#0B1H
SETB TR0
WAIT: JNB TF0,WAIT
RET
display:
mov dat,a
setb rs ;RS=1 For DATA REGISTER
setb en
clr en
acall ready
ret
end