This tutorial is about using I2C device on Embedded Linux. We will interface I2C EEPROM with a board running Embedded Linux. We will use a Beaglebone board, but you can any board of your choice ( Linux capable). We are going to use C Code for reading and writing from EEPROM. We are using AT24C02 I2C EEPROM from Atmel.
EmbeddedCraft YouTube Channel Reference
We have created video tutorials explaining using I2C interface with Beaglebone Black Board.
Preparing Development host and Ruining and Debug Embedded Linux Application using GDB Server and GDB
Beaglebone Black Board: Serial Port Interfacing, Connecting Beaglebone Black board with Serial Port
What is I2C
What should be the communication between a temperature sensor and Microprocessor. Or communication between ADC chip and Microprocessor. Temperature sensor and ADC have two different functionality. How to make any standard method for communication between Microprocessor and ADC or Temperature sensor kind of chip.
Answer came from Phillips, ( NXP nowadays). In 1982, Phillips has developed I2C protocol. I2C bus is for communication between digital devices. There will be a master and a slave device. I2C is called Inter Integrated Circuit. Data transfer speed for I2C could be upto 3.4 mbps. Generally, it is 100 kbps.
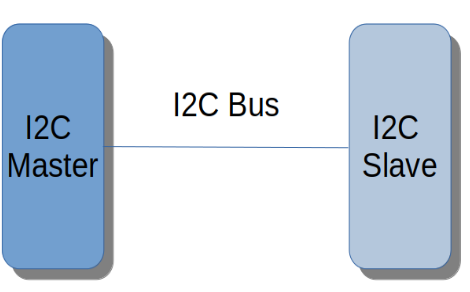
Figure 1: I2C Bus
I2C is a master and slave configuration. There will be Single master and one or many slaves.
I2C has two lines
SDA: Serial data line
SCL: Serial clock line
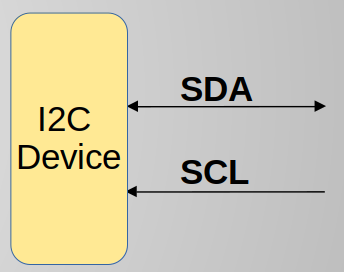
SDA
SDA is bi Directional Line. SDA is used to transfer data between I2C Master and I2C slave.
SCL
SCL line provide clock to slave device. SCL line is managed by I2C Master.
Figure 2: I2C Device with SDA and SCL lines
Question is ... if we have more than one slave on the I2C bus, then how master will identify each device.
I2C slave addressing
Every slave should have different address. Slave devices has own 7 or 10 bit address. Most of the slave devices has 7 bit address. Refer I2C slave device data sheet to know how address is formed.
Let us consider example of AT24C02 chip. We gather following information from the data sheet of At24C02 chip ...
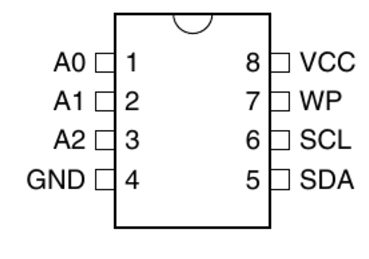
Figure 3: Pins of AT24C02
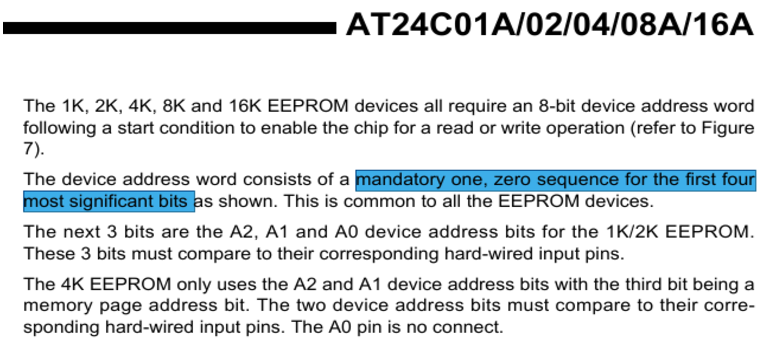
Figure 4: addressing as mentioned in data sheet of AT24C02
As per data sheet first 4 bits are mandatory one, zero sequence( 1010), refer Figure 3.
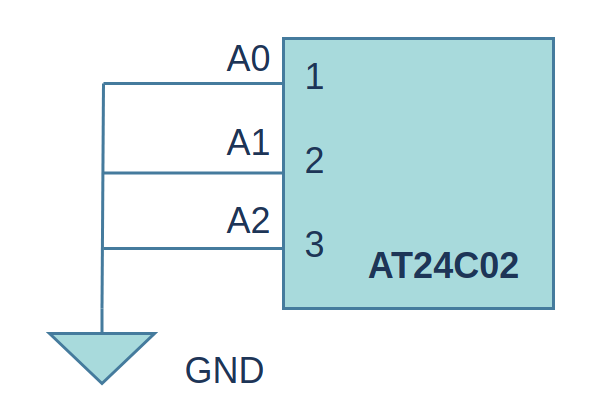
Address lines A2, A1 and A0 can be wired to +V or to Ground.
We are wiring A2, A1 and A0 to ground.
Figure 5: Wiring of Address lines
Let us determine address of I2C EEPROM as per above schematic.
address format ...
7 |
6 |
5 |
4 |
3 |
2 |
1 |
0 |
0 |
1 |
0 |
1 |
0 |
A2 |
A1 |
A0 |
Bit 2 to 0: 000
Address lines A2, A1 and A0. And we have wired them to ground.
Bit 6 to 3: 1010
mandatory 1010, as per data sheet.
Bit 7: 0
it is 0, because address is represented as one byte.
This will create address as 0x50 (0101_0000). Linux will report I2C EEPROM address as 0x50.
Read/write select bit
1: read operation
0: write operation. This bit is managed by Linux I2C driver.
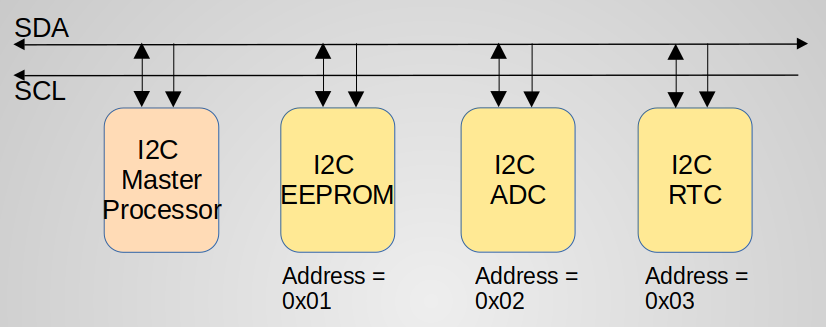
In a nutshell, one I2C master can be connected with more than one I2C slave chips.
Figure 6: I2C Master with three I2C Slave
For example, in Figure 6, there are three I2C slave, connected to I2C master. Each I2C slave A2 to A0 lines are wired in such a way to that addresses will become 0x01, 0x02 and 0x03.
AT24C02 I2C EEPROM
We are using AT24C02 EEPROM, from Microhip. AT24C02 size is 2K. It means it case store total 2048 bits. This EEPROM is organized as words of 8 bits. so, total number of 8 bits words is 256. Each word is randomly addressable. As we have seen address of I2C EEPROM chip will be 0x50.
I2C EEPROM Connection
Let us see the connection of EEPROM with beaglebone black. We are going to use I2C bus 2. As per board documentation, I2C SCL line is at port 9 and pin number 19. I2C SDA line is at port 9 and pin 20.
Figure 7: I2C Module Connection
EEPROM Programming I2C Utilities
Linux provide I2C Utilities, which can be used directly from terminal
I2cdetect : Detect I2C Slave connected on I2C Bus
I2cset : Write to I2C Slave
I2cget : Read from I2C Slave
I2C Utilities Manual
|
Help for I2C utilities are available in Linux. Type - man i2cdetect
Install utilities i2c-tools, use sudo apt get i2c-tools
|
Once we connect I2C device on I2C bus, we can use i2cdetect utility to verify the presence of device and check the device address as reported by Linux. After connecting I2C AT24C02 EEPROM, we can probe I2C chip connected at bus 2, and searching address range 0x50 0x50. Here is the output...
$ i2cdetect -r 2 0x50 0x50
WARNING! This program can confuse your I2C bus, cause data loss and worse!
I will probe file /dev/i2c-2 using read byte commands.
I will probe address range 0x50-0x50.
Continue? [Y/n] Y
0 1 2 3 4 5 6 7 8 9 a b c d e f
00:
10:
20:
30:
40:
50: 50
60:
70: |
Linux I2C driver has detected EEPROM at address 0x50.
Explaining i2cdetect
-r = use receive byte command for probing
2 = scan i2c bus number 2
0x50 0x50 = start probe from address 0x50 and end probe at address 0x50.
"–" =The address was probed but no chip answered.
"UU" =Probing was skipped, because this address is currently used by driver.
Writing to I2C EEPROM
As now I2C device is detected and Linux has identified it at address 0x50 on I2C bus 2. We can use i2cset utility to write to register 0x00. Let us write 0x80 data.
$ i2cset -f -y 2 0x50 0x00 0x80 |
We should able to write to EEPROM. In short Register[0] <= 0x80.
Explaining i2cset
-f = force access
-y = disabling interactive mode
2 = I2C bus 2
0x50 = EEPROM address on I2C bus 2
0x00 = register number or location 0
0x80 = we are writing 0x80 data at location 0
Reading from I2C EEPROM
I2cget utility is used to read from I2C EEPROM. We will read from register 0x00.
$ i2cget -y 2 0x50 0x00
0x80 |
returned value is 0x80.
Explaining i2cget
-y = disabling interactive mode
2 = I2C bus 2
0x50 = EEPROM address on I2C bus 2
0x00 = register number or location 0
Coding : C Code
IOCTL system call is used to access EEPROM in C. IOCTL system calls are used to access device parameter. When standard IO calls not possible to use, IOCTL is used.
Note !
Refer man pages of ioctl. Type - man ioctl
I2C Bus 2 , support block read and write. It means we can prepare a buffer and do read/write at multiple location in single call. Refer following output of i2cdetect output.
$ i2cdetect -F 2
Functionalities implemented by /dev/i2c-2:
I2C yes
SMBus Quick Command no
SMBus Send Byte yes
SMBus Receive Byte yes
SMBus Write Byte yes
SMBus Read Byte yes
SMBus Write Word yes
SMBus Read Word yes
SMBus Process Call yes
SMBus Block Write yes
SMBus Block Read no
SMBus Block Process Call no
SMBus PEC yes
I2C Block Write yes
I2C Block Read yes |
As we can see from last two license, I2C Block read and write is possible on I2C Bus 2.
Explaining i2cdetect -F 2
-F = check the functionality of I2C bus
2 = I2C bus 2
I2C Read Write source code
Download Source Code |
Explanation |
int main(void) {
int f,i=0,n=0; char buf[10];
/* Open the adapter and set the address of the I2C device */
(1) f = open("/dev/i2c-2", O_RDWR);
/* Set the address of the i2c slave device */
(2) ioctl(f, I2C_SLAVE, I2C_ADDRESS) == -1)
/* write 9 bytes at 0x50*/
(3) buf[0] = 0x50; // location is 0x50
(4) buf[1] = 0x30; // 0x30 is for location 0x50
buf[2] = 0x31; // 0x31 is for location 0x51
buf[3] = 0x32; // 0x32 is for location 0x52
buf[4] = 0x33; // 0x33 is for location 0x53
buf[5] = 0x34; // 0x34 is for location 0x54
buf[6] = 0x35; // 0x35 is for location 0x55
buf[7] = 0x36; // 0x36 is for location 0x56
buf[8] = 0x37; // 0x37 is for location 0x57
buf[9] = 0x38; // 0x38 is for location 0x58
(5) n = write(f, buf, 10); |
(1) open I2C bus 2, in read write mode. File handle will be f.
(2) - ioctl call, to set address of I2C device.
I2C_SLAVE is 0x0703 (pre-defined)
refer i2c-dev.h
I2C_ADDRESS is 0x50.
(3) - buf [0] is getting starting location from where we want to write. We want to write to location 0x50 onwards.
(4) - buf [1] to buf [9] will get data, which will be written to location 0x50 to 0x58.
(5) content of buffer will be written to f. |
/* Set the 16-bit address to read*/
(6)buf[0] = 0x50; /* address byte 1 */
(7) n = write(f, buf,1);
(8)for (i=0;i<10;i++) buf[i]= 0;
//read 9 bytes from that address
(9)n = read(f, buf,9);
|
This portion of code is about reading from I2C EEPROM
(6) and (7) setting location from where we want to read. We are reading from location 0x50.
(8) clearing buffer
(9) reading 9 bytes, because in (5) we have written from location 0x50 to 0x58, total 9 bytes. |
Source Code can be downloaded from Here.
Advancing
Reading and writing from I2C device is reasonably simple, and only I2C driver is enough.
You can learn more about I2C driver from kernel.org.
https://git.kernel.org/pub/scm/linux/kernel/git/stable/linux.git/tree/drivers/i2c?h=v4.19.194
Refer path: root/drivers/i2c/i2c-dev.c
functions i2cdev_read, i2cdev_write, i2cdev_ioctl are responsible for I2C read and I2C write.
Code for controlling SDA and SCL lines is available at ...
root/drivers/i2c/algos/i2c-algo-bit.c
Reference
1. I2C bus at wikipedia
2. AT24C02 I2C EEPROM at Microchip website