We are going to describe, running bare minimum Linux on QEMU. We will create Linux Kernel and Linux ramdisk file system. After that we will run newly compiled Linux kernel on virtual X86 PC on QEMU.
We have created video tutorials based on this article. In video tutorial, we are showing creating bare minimum Linux and running it on QEMU emulator. We are showing configuring Linux kernel and Creating root file system using Busybox. We are installing QEMU for X86_64 and running compiled kernel with initramfs.
Preparation
We have tried below mentioned steps on Ubuntu 18.04 LTS version, but these steps should also work on latest version of Ubuntu or any other Linux distribution.
Following tools has to be installed on Ubuntu Host.
QEMU
Command to install Qemu
$ sudo apt-get install qemu-system-x86
Utilities
Command to install build essentials, lzop, flex, bison and ncurses is following ...
$ sudo apt-get build-essential
$ sudo apt-get install lzop flex bison libncurses-dev
Download Linux Kernel and BusyBox
Create workspace directory and cd to workspace directory
$ mkdir ~/workspace_kernel_mini && cd ~/workspace_kernel_mini
Downloading latest Linux Kernel
$ wget https://cdn.kernel.org/pub/linux/kernel/v5.x/linux-5.13.2.tar.xz
Note - At the time of writing this article, latest version of kennel was v5.13.2. Latest version should be used.
Downloading latest Busybox
$ wget https://busybox.net/downloads/busybox-1.33.1.tar.bz2
Creating Bare minimum Linux
cd to workspace directory
$ cd ~/workspace_kernel_mini
extracting the kernel source
$ tar -xvf linux-5.13.2.tar.xz
Cd to linux source directory
$ cd linux-5.13.2
Configure tiniest possible kernel
$ make allnoconfig
This will create .config file setting values to 'n' as much as possible. For more refer Documentation/admin-guide/README.rst at kernel.org.
Customization
$ make menuconfig
This will open configuration options. Now set following options
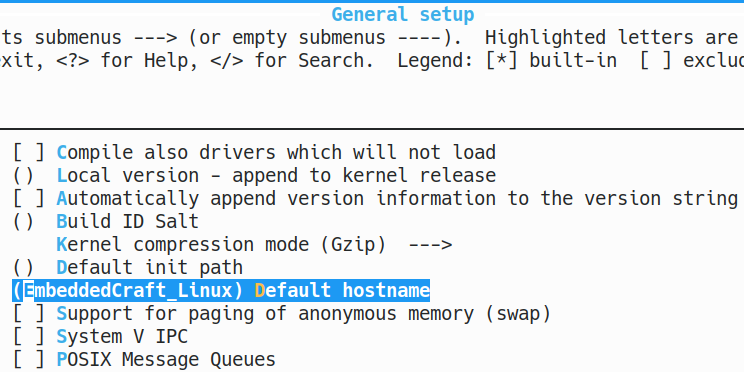
Option 1: Host name
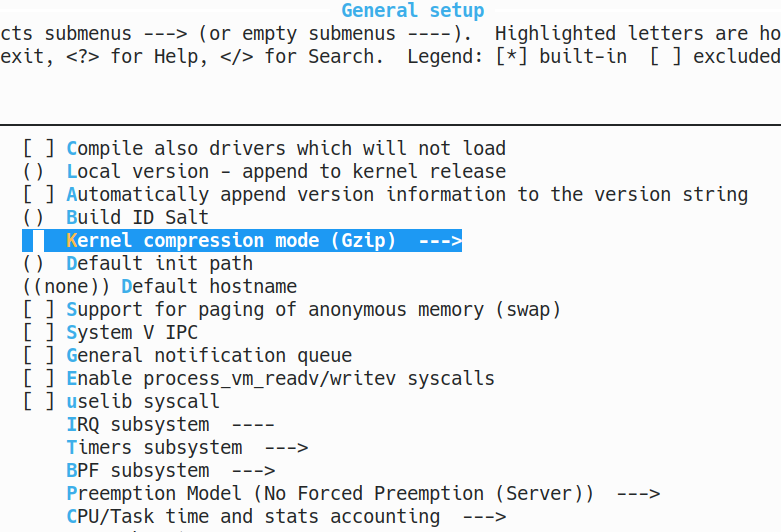
General setup > Default hostname EmbeddedCraft_Linux
Option 2: Enable 64 bit support
64-bit Kernel
Option 3: Enable support for RAM disk
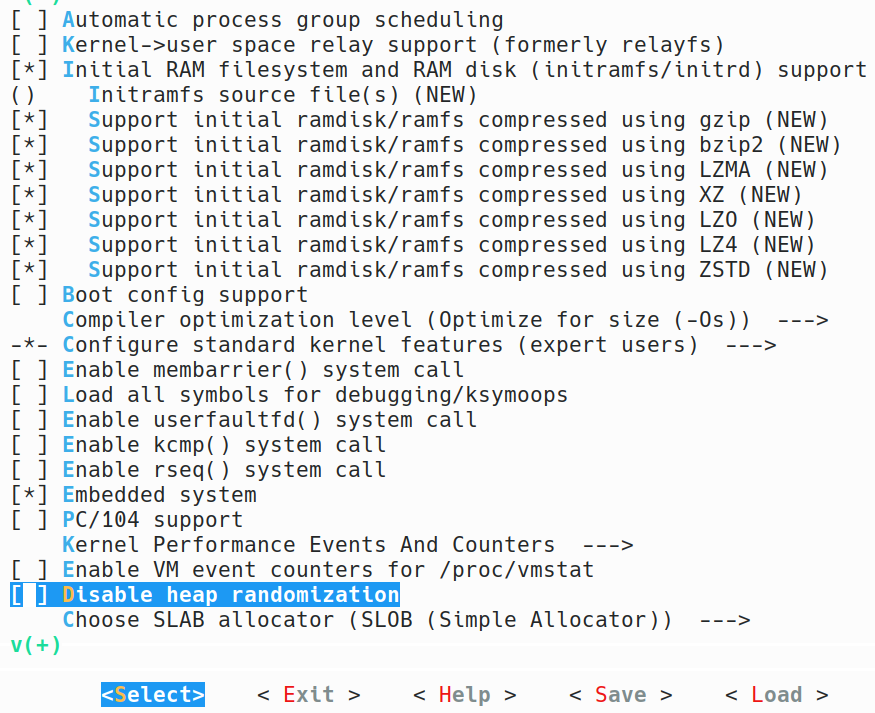
General Setup > Initial RAM filesystem and RAM disk (initramfs/initrd) support
Option 4: Enable printk support
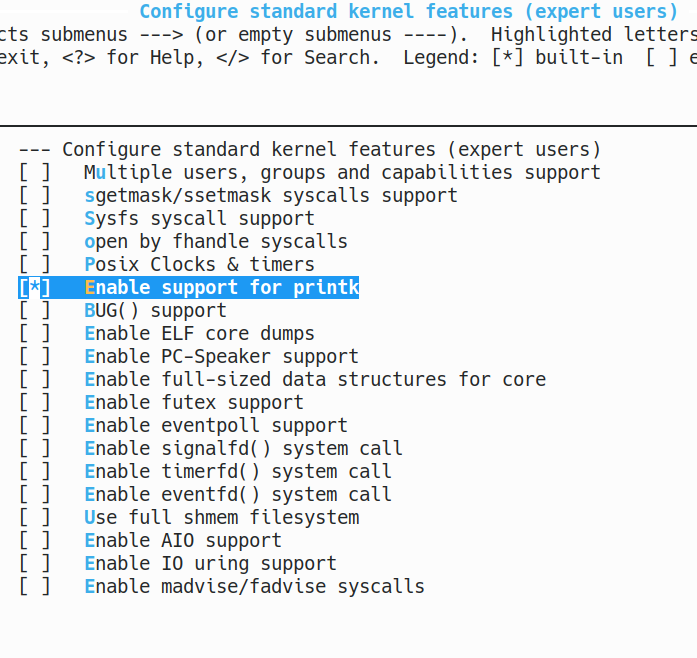
General Setup > Configure standard kernel features (expert users) > Enable support for printk
Option 5: Ensure Gzip Kernel compression
General Setup >kernel compression mode (Gzip)
Option 6: ELF binary and script
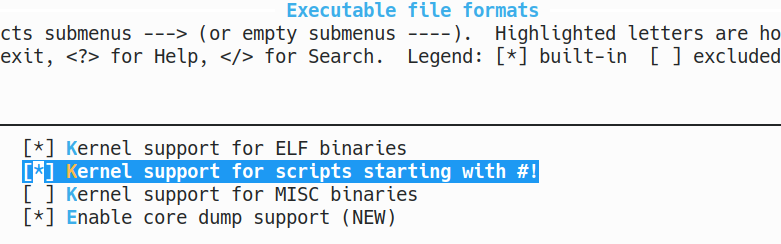
Executable file formats > Kernel support for ELF binaries
Executable file formats > Kernel support for scripts starting with #!
Option 7: Enable devtmpfs
Device Driver > Generic Driver Options > Maintain a devtmpfs filesystem to mount at /dev
Device Driver > Generic Driver Options > Automount devtmpfs at /dev, after the kernel mounted the rootfs
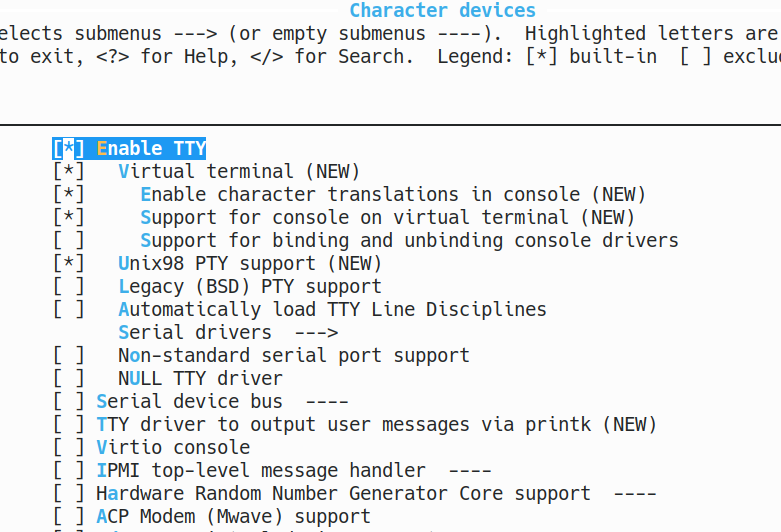
Option 8: Enable TTY
Device Driver > Character devices > Enable TTY
Option 9: Enable Serial Drivers
Device Driver > Character devices > Serial Drivers > 8250/16550 and compatible serial support
Device Driver > Character devices > Serial Drivers > Console on 8250/16550 and compatible serial port
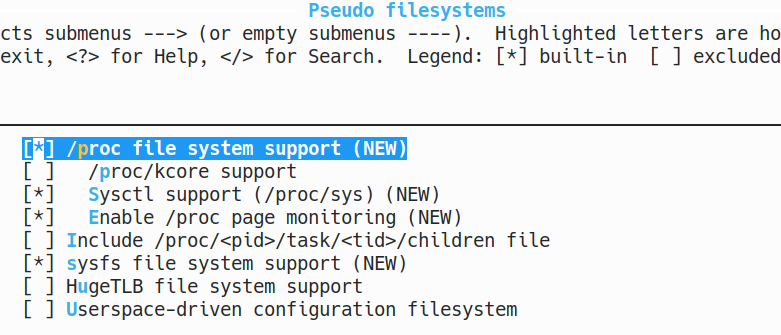
Option 10: Pseudo filesystems
File systems > Pseudo filesystems > /proc file system support
File systems > Pseudo filesystems > /sysfs file system support
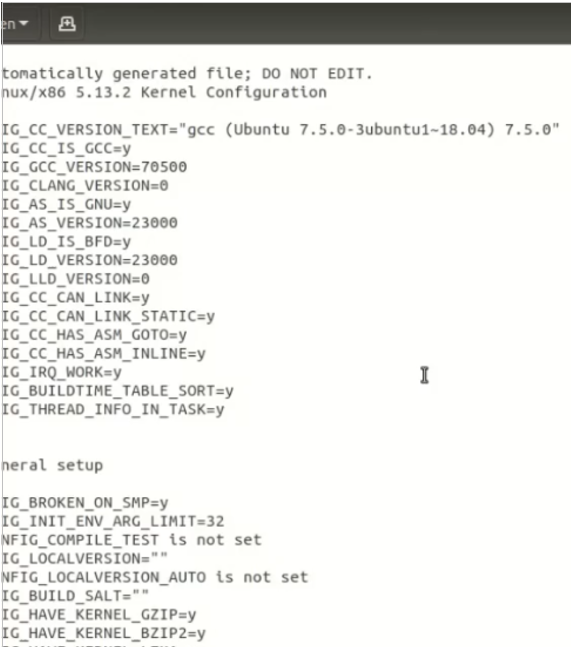
Now, save and close configuration window. This will save .config file.
We can review .config file …
$ gedit .config
Building Linux Kernel
Here is the build command to build Linux kernel.
$ make -j4
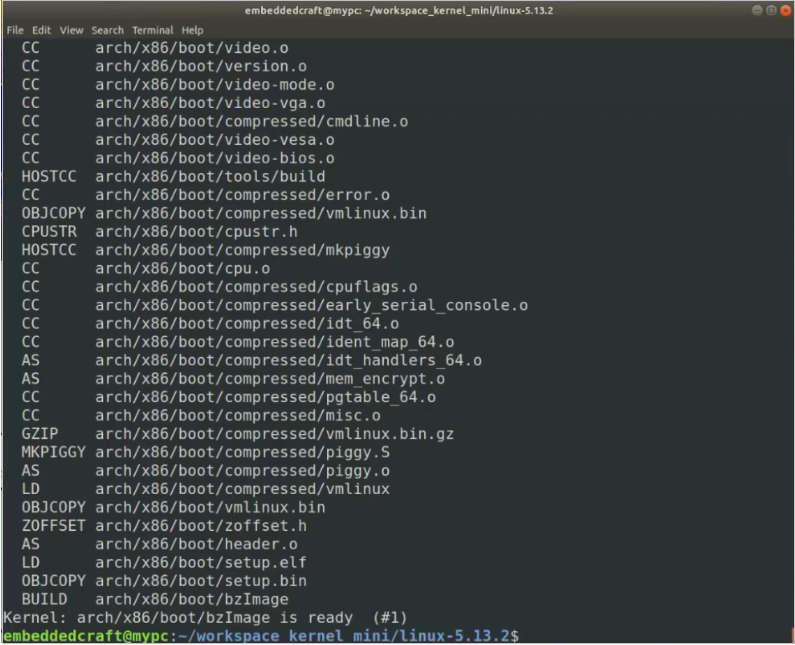
depending on the internet speed and PC configuration, this will take some time. Once build is complete, you can verify presence of kernel.
Enter to boot directory in linux kernel
$ cd ~/workspace_kernel_mini/linux-5.13.2/arch/x86_64/boot
and check the presence of bzImage.
$ ls -lsh
total 0
0 lrwxrwxrwx 1 embeddedcraft embeddedcraft 22 Aug 23 15:50 bzImage -> ../../x86/boot/bzImage
bzImage is the link to bzImage available x86/boot directory.
$ cd ~/workspace_kernel_mini/linux-5.13.2/arch/x86/boot
$ ls -sh bzImage
1.4M bzImage
Linux kernel bzImage is of 1.4 MB only.
Now we have Linux kernel available. Next is creating initram disk.
Creating Initramfs
cd to workspace directory
$ cd ~/workspace_kernel_mini
extracting the Busybox source tree
$ tar -xvf busybox-1.33.1.tar.bz2
Cd to busybox
$ cd busybox-1.33.1
Customize busybox
$ make menuconfig
This will start configuration menu for BusyBox. We need only one setting.
Settings > Build static binary (no shared libs)
Now, exit and save.
It is time to build busybox.
Build
$ make -j4
Install
$ make install
This will install binaries in “./_install” directory
Cd to workspace directory
$ cd ~/workspace_kernel_mini
creating embeddedcraft_minilinux directory and cd to embeddedcraft_minilinux
$ mkdir embeddedcraft_minilinux && cd embeddedcraft_minilinux
its time to create required directory. We need etc, proc, sys and dev directory.
$ mkdir -p etc proc sys dev
Coping all busybox installed files to ~/workspace_kernel_mini/embeddedcraft_minilinux directory
$ cp -a ../busybox-1.33.1/_install/* .
Create init script in embeddedcraft_minilinux directory.
This is the content of init script.
#!/bin/sh
mount -t proc none /proc
mount -t sysfs none /sys
cat <<!
boot took $(cut -d' ' -f1 /proc/uptime) seconds
Welcome to EmbeddedCraft Mini Linux for Learners !!!
!
exec /bin/sh
Let us create init file.
$ gedit init
and copy above mentioned content in the init file.
We can verify content of init script as following ...
$ cat init
#!/bin/sh
mount -t proc none /proc
mount -t sysfs none /sys
cat <<!
boot took $(cut -d' ' -f1 /proc/uptime) seconds
Welcome to EmbeddedCraft Mini Linux for Learners !!!
!
exec /bin/sh
It is time to make init file executable. Give executable permission to init file
$ chmod +x init
Creating initramfs as cpio archieve
$ find . -print0 | cpio --null -ov --format=newc | gzip -9 > initramfs.cpio.gz
.
./usr
./usr/sbin
./usr/sbin/chat
./usr/sbin/dnsd
./usr/sbin/setfont
./usr/sbin/ubidetach
./usr/sbin/inetd
./usr/sbin/ubiattach
{skipping messages }
./proc
cpio: File ./initramfs.cpio.gz grew, 1310720 new bytes not copied
./initramfs.cpio.gz
./etc
./linuxrc
./sys
7936 blocks
Note : Description of find . -print0 | cpio --null -ov --format=newc | gzip -9 > initramfs.cpio.gz
find . -print 0 : this will create a list of all files. print the full file name on the standard output, followed by a null character
cpio --null -ov --format=newc: copy file to archive, use newc (SVR4) archive format , -o = create , -v verbosly list all files processed
gzip -9 > initramfs.cpio.gz : creating gzip file, with compression speed 9.
initramfs.cpio.gz should be created.
Booting Mini Linux in QEMU
Now we have, Linux kernel ...
$ ~/workspace_kernel_mini/linux-5.13.2/arch/x86_64/boot/bzImage
And ramfs ...
$ ~/workspace_kernel_mini/embeddedcraft_minilinux/initramfs.cpio.gz
it is time to start QEMU and booting our mini Linux.
$ qemu-system-x86_64 \
-kernel ~/workspace_kernel_mini/linux-5.13.2/arch/x86_64/boot/bzImage \
-initrd ~/workspace_kernel_mini/embeddedcraft_minilinux/initramfs.cpio.gz \
-append "init=/bin/sh console=ttyS0" -nographic
Here is the description of command
Command |
Description |
qemu-system-x86_64 |
Command to start QEMU for system. |
-kernel ~/workspace_kernel_mini/Linux
-5.13.2/arch/x86_64/boot/bzImage \ |
-kernel option to provide path of bzImage. |
-initrd ~/workspace_kernel_mini/embeddedcraft_minilinux/initramfs.cpio.gz \ |
-initrd option to provide initramfs file. |
-append "init=/bin/sh console=ttyS0" |
-append provide command line argument for Linux kernel. |
-nographic |
We dont want to use graphics. |
This should boot Linux Kernel.
$ qemu-system-x86_64 -kernel ~/workspace_kernel_mini/linux-5.13.2/arch/x86_64/boot/bzImage \
-initrd ~/workspace_kernel_mini/embeddedcraft_minilinux/initramfs.cpio.gz \
-append "init=/bin/sh console=ttyS0" -nographic
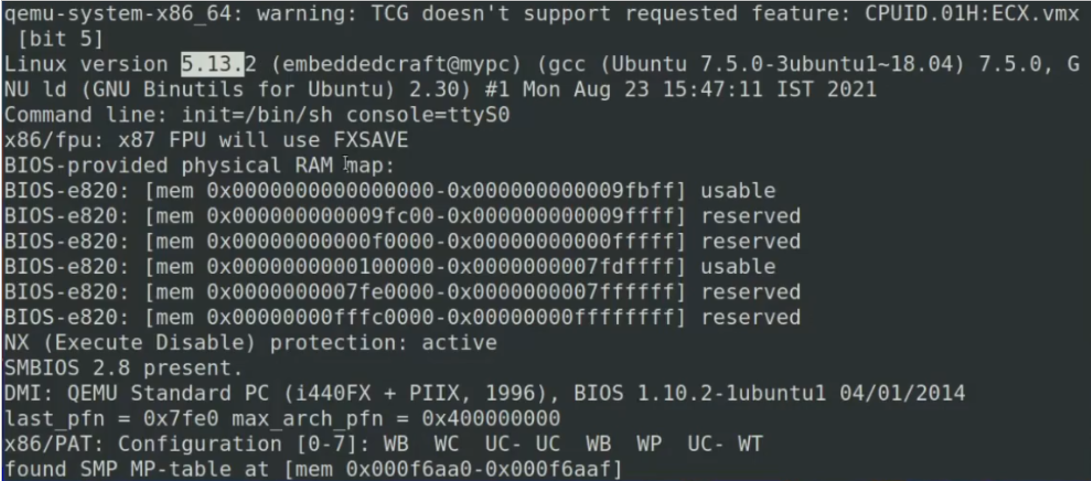
Linux version 5.13.2 (embeddedcraft@mypc) (gcc (Ubuntu 9.3.0-17ubuntu1~20.04) 9.3.0, GNU ld (GNU Binutils for Ubuntu1
Command line: init=/bin/sh console=ttyS0
x86/fpu: x87 FPU will use FXSAVE
BIOS-provided physical RAM map:
BIOS-e820: [mem 0x0000000000000000-0x000000000009fbff] usable
NX (Execute Disable) protection: active
// ----
boot took 0.58 seconds
Welcome to EMBEDDEDCRAFT Mini Linux
/bin/sh: can't access tty; job control turned off
/ # clocksource: tsc: mask: 0xffffffffffffffff max_cycles: 0x325ac60cf80, max_idle_ns: 440795363783 ns
clocksource: Switched to clocksource tsc
/ #
Review of bare minimum Linux Kernel running in QEMU
Now we can try multiple commands to review our bare minimum Linux.
1) uname -a
/ # uname -a
Linux EmbeddedCraft_Linux 5.13.2 #2 Tue Aug 3 18:44:46 IST 2021 x86_64 GNU/Linux
This command return system host name, Linux Kernel version (5.13.2), Build date. And CPU architecture ( x86_64).
2) top
top command display all the process running in Linux. You can see we have /bin/sh which is bourne shell . Process ID (PID) of bourne shell is 1. and second process is kthreadd, process Id is 2. kthreadd is the kernel thread started after init and all kernel threads are descendant of kthreadd.
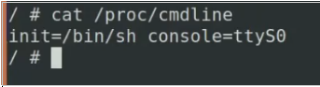
3) cat /proc/cmdline
This command shows command line argument give to the kernel. Refer append argument for QEMU.
$ qemu-system-x86_64 \
-kernel ~/workspace_kernel_mini/linux-5.13.2/arch/x86_64/boot/bzImage \
-initrd ~/workspace_kernel_mini/embeddedcraft_minilinux/initramfs.cpio.gz \
-append "init=/bin/sh console=ttyS0" -nographic
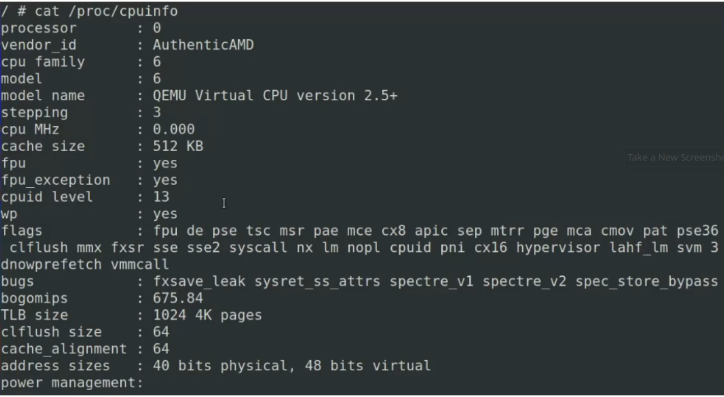
4) cat /proc/cpuinfo
you can review parameter related to CPU. Model name is QEMU Virtual CPU. Cache size is 512 KB. FPU is available and all CPU flags are listed here.
5) dmesg
This command shows all kernel messages which were routed to ttyS0. You should able to find following information in kernel messages.
Machine Name: QEMU Standard PC (i440FX + PIIX, 1996)
CPU: AMD QEMU Virtual CPU version 2.5+ (family: 0x6, model: 0x6, stepping: 0x3)
MHz: 3493.362
RAM disk size: 2.6 MB, starting from 0x7d4_20000
RAM: 128 MB